
We know that concepts like IoT, smart cities, automation systems, and Industry 4.0 are gaining momentum now, so choosing the right communication protocol for a system/project is very significant. There are already a lot of wireless protocols like Bluetooth, WiFi, and cellular networks. We are now going to see how LoRa is different and necessary in this ecosystem.
Why LPWAN?
The wireless connections like Wi-Fi, Bluetooth, and Cellular (GSM, 4G) are popular choices among IoT enthusiasts, most of them lack an adequately long range of coverage or require too much power to operate consistently. This is where LPWAN comes in, filling the gap between long-range coverage and low power requirements that other wireless technologies cannot maintain.
What is LPWAN, LoRaWAN and LoRa?
Firstly, the terms LPWAN, LoRaWAN, and LoRa are not interchangeable. LPWAN (Low Powered Wide-Area Network), is a wireless connectivity system that is both long-range and low power. LPWAN is not a singular technology, but rather a term used to describe any wireless technology that achieves a long operating range while maintaining low power requirements. LPWAN platforms are usually created with IoT applications in mind. Some of the most popular LPWAN technologies include LoRa, Sigfox.
The term LoRa stands for Long Range. It is a wireless low-power radiofrequency technology introduced by a company called Semtech. It is based on spread-spectrum modulation techniques derived from chirp spread spectrum technology- the same way bats and dolphins communicate.
It can transmit data over longer distances compared to the other wireless technologies making it well suited for sensors and actuators that operate in low power mode. Therefore LoRa is ideal for applications that transmit small chunks of data over a longer period and consistently.
The LoRaWAN open specification is a low power, wide-area networking (LPWAN) standard based on Semtech’s LoRa devices.
Here are some of the use cases specified by Semtech,
Industrial Water Leak Detection:helps in detecting and preventing water leakage in homes and businessesGas Leak Prevention:detects natural gas (methane) leaks with ultra-selectiveness, allowing for instant alert of any devastating gas leak for response and potentially save lives.Smart Flood Sensors:helps to build safer, more resilient communities.Water System Monitoring:LoRa-based sensors remotely measure, monitor and analyze wastewater and groundwater systems to more effectively address shortages, floods and environmental regulations.
LoRa can operate in licensed and license-free ISM bands like 335 MHz, 433 MHz, 868 MHz, 915MHz, etc. But, In India, the unlicensed frequency band is from 865MHz to 867MHz and does not cover 868 MHz.

RYLR896 LoRa module
RYLR896 is the breakout board including pins, an STM32L microcontroller IC, antenna, and an RYLR890 module. The RYLR890 module is based on the Semtech SX1276 LoRa Engine and contains all the “LoRa logic”. According to REYAX, the module is supposed to achieve a typical communication distance of 4.5 km. Naturally, the communication distance depends on many aspects. Nonetheless, 4.5 km should be achievable under normal conditions (e.g. clear line-of-sight).
Main Features:
- Certification: NCC, FCC
- Semtech SX1276 Engine
- High efficiency Power Amplifier
- Excellent blocking immunity
- Low Receive current
- High sensitivity
- Controlled easily by AT commands
- 127 dB Dynamic Range RSSI
- Designed with integrated antenna
- AES128 Data encryption
- Operation temperature: -40℃ to +85℃
Protocol:
Here, we will use the UART protocol to send and receive the data from one LoRa to another LoRa module.
Step 1: What You Will Need
- Two Arty7 100t boards with either
parashu or vajraprogrammed - Two RYLR896 LoRa modules.
- Micro USB Cables.
- Jumper Wires.
- Two PCs with a complete Shakti ecosystem.
- shakti-sdk and shakti-tools installed or Platform IO installed and ready
Note: shakti-sdk and shakti-tools are currently a private repository. Please login or sign up to Gitlab and request access here before using it.
Step 2: The Circuit for both transmitter & receiver
- The VCC of LORA connect to VCC
- The GND of the LORA connect to GND
- The TX of the LORA connect to GPIO 0
- The RX of the LORA connect to GPIO 1

Check the device pin mapping for parashu and vajra.
Step 3: Code
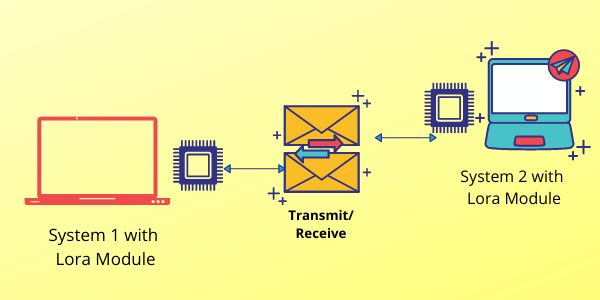
In this setup, we have two Arty A7 boards connected to two systems in separate rooms. Then we try to send "hello" from one system to another. Each arty A7 board is connected to a LORA module, through which Long-range communication happens.
AT Commands,
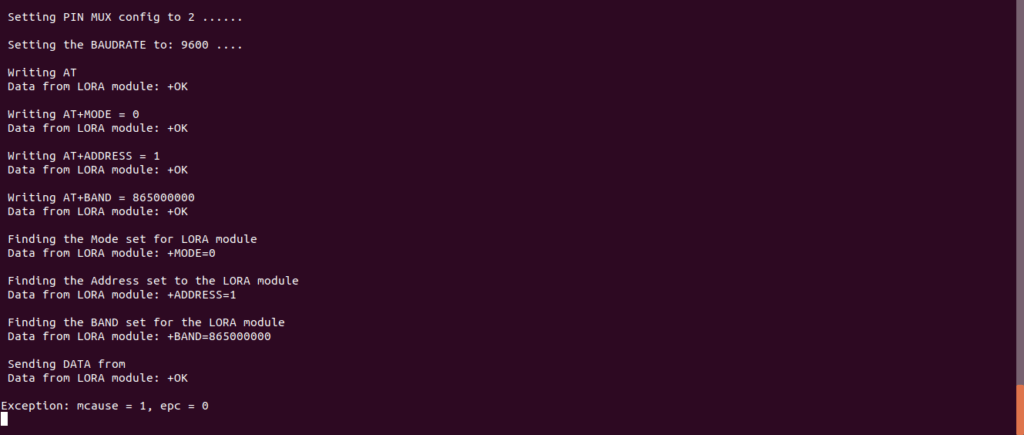
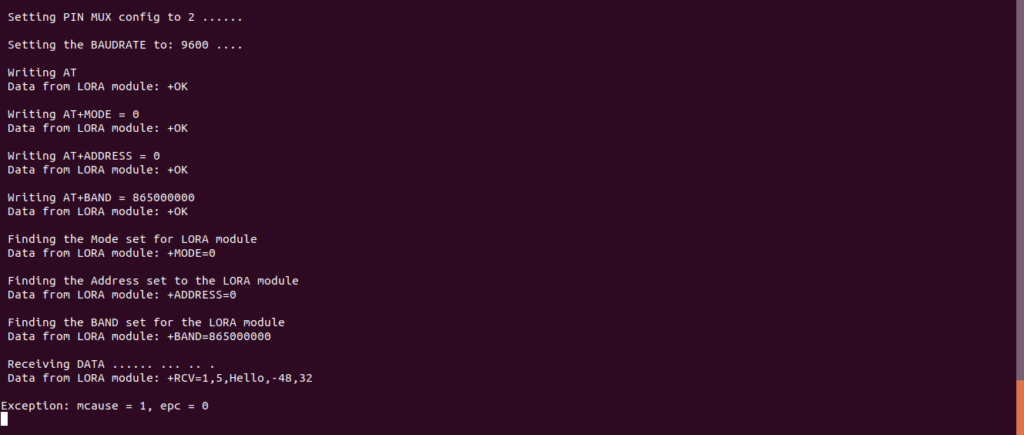
AT Commands are used to interact with the Lora modules. We use the bandwidth 865000000 as 868000000 is not usable in India. Let us see the list of AT commands to set up the Lora module for both transmit/receive.
- Firstly, write
ATto which you should receive a response+OK - Then use
AT+Modeto set the Mode of the module and get a response +OK- 0:Transmit and Receive mode (default)
AT+Mode=0 - 1:Sleep mode
AT+Mode=1
- 0:Transmit and Receive mode (default)
- Then proceed to set
AT+ADDRESS=<address>.<address>can be 0~65535(default 0) - Use
"AT+BAND"to set the center frequency of the wireless band in Hz. The transmitter and the receiver are required to use the same frequency to communicate with each other.- Example: Set the frequency as 868500000 Hz,
AT+BAND=868500000
- Example: Set the frequency as 868500000 Hz,
- Use
AT+Resetto reset the system at any time.
To transmit data or a message to the specified address set for LoRa.
- Use
AT+SENDcommand to send values between two lora modules.Syntax: AT+SEND=[Address],[Payload_Length],[Data]
[Address]:0~65535, When the [Address] is 0, it will send data to all addresses (From 0 to 65535.)[Payload_Length]: Maximum 240 bytes[Data]:ASCII Format
- For instance,
AT+SEND=0,5,Hello
Please click here to have a look at the transmitter code and click here to have a look at the receiver code. Also here is the complete guide for AT commands used with this module
Code can be compiled and run using the following ways,
- Using a terminal on a system with shakti-sdk and shakti-tools installed (Manual method).
- Using Platform IO IDE.
Step 4.1: Manual Method
4.1.1 Compile and build
- Move to
shakti-sdk
cd shakti-sdk
- Compile using
make software PROGRAM=? TARGET=?. Target can be eitherparashu or vajra.
For instance, use the following command for transmitter program with parashu as target,
make software PROGRAM = lora_transmit.c TARGET=parashu
For instance, use the following command for receiver program with parashu as target,
make software PROGRAM = lora_receive.c TARGET=parashu
4.1.2 Execution:
Once the application is built, the executable is generated in the output folder. The executable is in ELF file format and they have the extension .shakti. Now, open three terminals, one for each of the following,
- One terminal for UART terminal display
(miniterm) - Another for
GDB server - And the last one for
OpenOCD.
Terminal 1: Firstly Connect to serial output by using miniterm or gtkterm with the baud rate of 19200.
For instance,
$ sudo miniterm.py /dev/ttyUSB1 9600
Note:
- “/dev/ttyUSB1” – ttyUSB means “USB serial port adapter”
- The “1” (“0” or “1” or “2”“here means the USB device number on your system. The FPGA board is connected to that USB device number.
Terminal 2: After that, Connect to the FPGA board by using the OpenOCD provided by shakti-tools and its respective configuration file. (Read how OpenOCD and RISC-V GDB work together to establish a connection between our PC and the Microprocessor)
For instance, if we use parashu,
$ cd shakti-sdk
$ cd ./bsp/third_party/parashu
$ sudo $(which openocd) -f ftdi.cfg
For vajra, Goto cd ./bsp/third_party/vajra>
Terminal 3: Now, open either 32-bit or 64-bit RISC-V GDB based on your architecture i.e riscv32-unknown-elf-gdb or riscv64-unknown-elf-gdb respectively from shakti-tools.
The output executable for lora-transmit code is created in <path-to-shakti-sdk>/software/examples/uart_applns/lora/output as lora_transmit.shakti.
The output executable for lora-receive code is created in <path-to-shakti-sdk>/software/examples/uart_applns/lora/output as lora_receive.shakti.
Load up the .shakti file by following the below steps,
$ riscv32-unknown-elf-gdb
(gdb) set remotetimeout unlimited
(gdb) target remote localhost:3333
(gdb) file path/to/executable
(gdb) load
(gdb) c
Output
Akshaya currently works at the RISE labs. Her favorite subjects are Web designing and Microprocessors. She loves learning about new things and writing about them!