OpenSBI (Open Supervisor Binary Interface) is a RISC-V specific runtime service provider. The goal of the OpenSBI project is to provide an open-source reference implementation of the RISC-V SBI specifications for platform-specific firmwares executing in M-mode.
The RISC-V Supervisor Binary Interface (SBI) is the recommended interface between:
- A platform-specific firmware running in M-mode and a bootloader, a hypervisor, or a general-purpose OS executing in S-mode or HS-mode.
- A hypervisor running in HS-mode and a bootloader or a general-purpose OS executing in VS-mode.
In this article, we are going to see how to build OpenSBI on SPIKE, QEMU and SHAKTI SoC.
Requirements,
- Spike simulator
- QEMU emulator
- Arty A7 Board with SHAKTI SoC (VAJRA) Programmed.
Step 1: Building OpenSBI
git clone https://github.com/riscv/opensbi.git
cd opensbi
export CROSS_COMPILE=riscv64-unknown-linux-gnu-
Step 2: OpenSBI on SPIKE
The Spike is a RISC-V ISA simulator which implements a functional model of one or more RISC-V harts.
Note: shakti-tools can be installed as spike is a part of it.
2.1 Check if SPIKE is successfully installed
username@Riselab:~$ which spike
/home/username/shakti-tools/riscv64/bin/spike
2.1 Building the payload
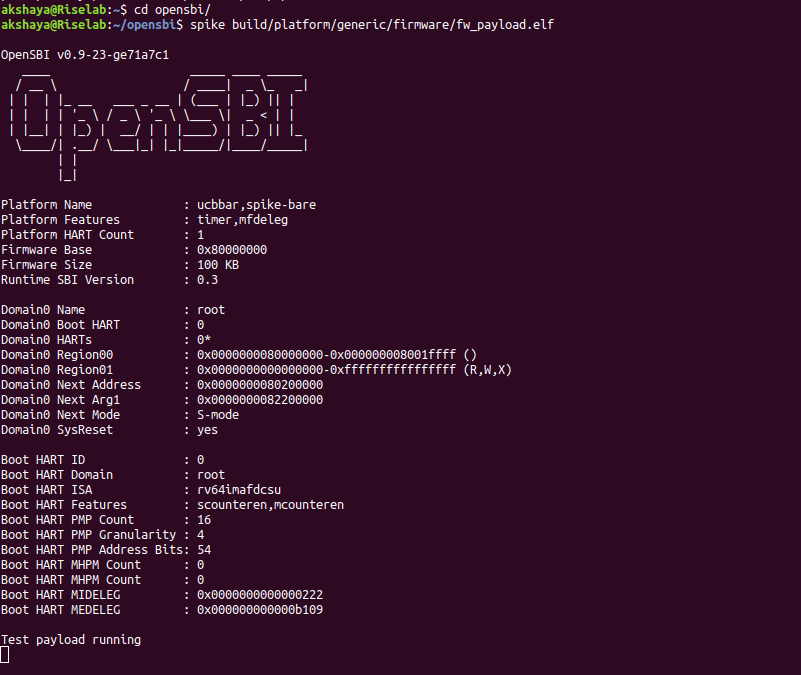
make PLATFORM=generic2.2 Running the test payload
spike build/platform/generic/firmware/fw_payload.elf
Step 3: OpenSBI on QEMU
3.1 Building QEMU for SHAKTI
git clone https://gitlab.com/shaktiproject/software/qemu.git
cd qemu
git checkout shakti/c-class
mkdir build
cd build
../configure --target-list="riscv32-softmmu riscv64-softmmu"
make
Then add this line to bashrc,
export PATH=$PATH:<path/to/qemu>/buildFor instance: export PATH=$PATH:/home/username/qemu/build
3.2 Check if the installation is successful
qemu-system-riscv64 -M helpThis command displays the available machines that qemu can simulate, shakti_c is what we require.
3.3 Building the payload for QEMU
cd opensbi
wget -c https://gitlab.com/behindbytes/shakti-binaries/-/raw/master/dts/shakti.dtb
export CROSS_COMPILE=riscv64-unknown-elf-
export FW_FDT_PATH=./shakti.dtb
make PLATFORM=generic
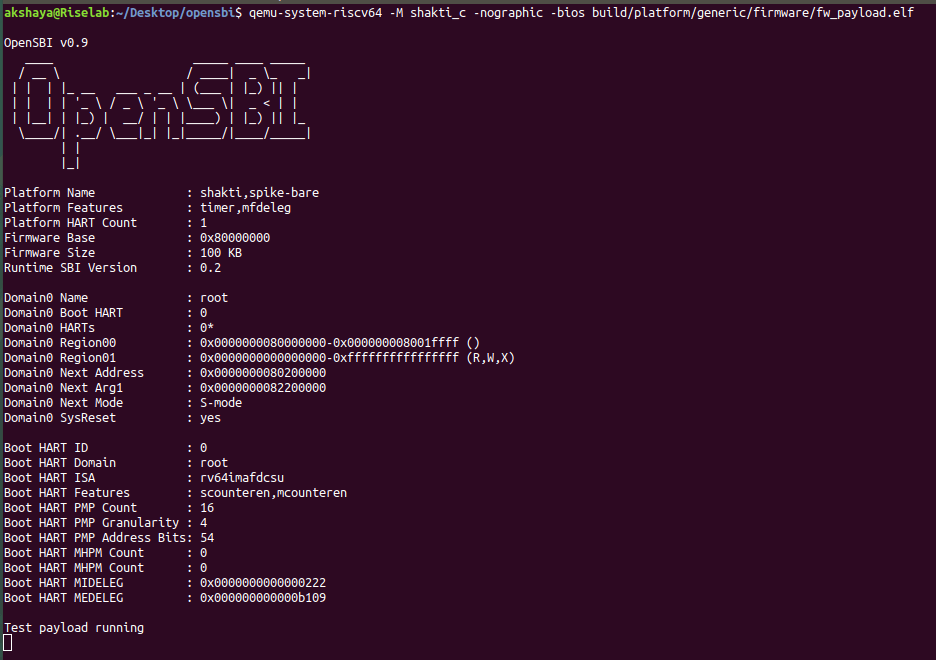
3.4 Running the test payload
qemu-system-riscv64 -M shakti_c -nographic -bios path/to/fw_payload.elf

Step 4: OpenSBI on SHAKTI SoC (Vajra)
4.1 Building SHAKTI OpenSBI
Firstly, we need to clone the shakti-opensbi repository and build the test payload.
git clone https://gitlab.com/shaktiproject/software/shakti-opensbi.git
cd opensbi
wget -c https://gitlab.com/behindbytes/shakti-binaries/-/raw/master/dts/shakti.dtb
export CROSS_COMPILE=riscv64-unknown-elf-
make PLATFORM=generic FW_FDT_PATH=./shakti.dtb
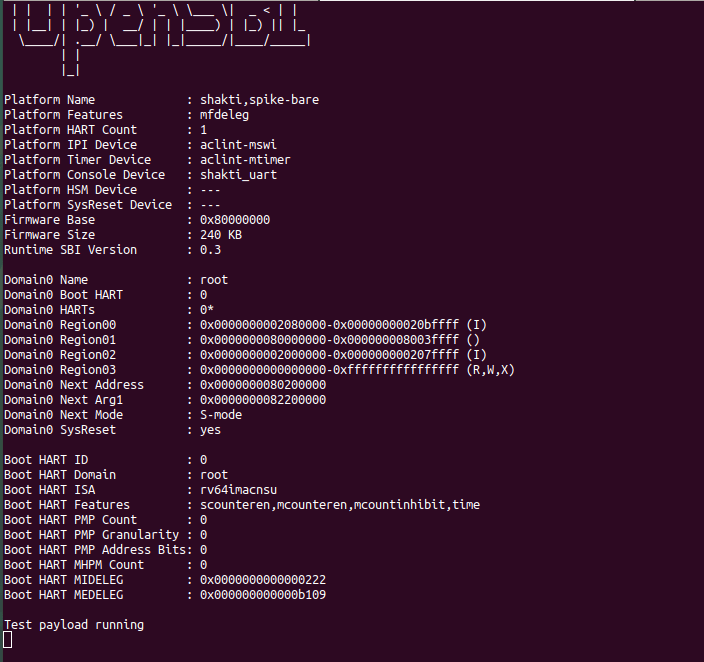
4.2 Running the test payload on SHAKTI-SOC
Now, open three terminals, one for each of the following,
Terminal 1: Firstly Connect to serial output by using miniterm or gtkterm with the baud rate of 115200
For instance,
$ sudo miniterm.py /dev/ttyUSB1 115200
Note:
- “/dev/ttyUSB1” – ttyUSB means “USB serial port adapter”
- The “1” (“0” or “1” or “2”“here means the USB device number on your system. The FPGA board is connected to that USB device number.
Terminal 2: After that, Connect to the FPGA board by using the OpenOCD provided by shakti-tools and its respective configuration file. (Read how OpenOCD and RISC-V GDB work together to establish a connection between our PC and the Microprocessor)
For instance,
$ cd shakti-sdk
$ cd ./bsp/third_party/vajra
$ sudo $(which openocd) -f ftdi.cfg
Terminal 3: Now, open RISC-V GDB riscv64-unknown-elf-gdb from shakti-tools.
The output executable is created in <path-to-shakti-opensbi>/build/platform/generic/firmware/ as . Load up the fw_payload.elf.elf file by following the below steps,
$ riscv32-unknown-elf-gdb
source gdb.script
file ~/Documents/shakti-opensbi/build/platform/generic/firmware/fw_payload.elf
load
c
Akshaya currently works at the RISE labs. Her favorite subjects are Web designing and Microprocessors. She loves learning about new things and writing about them!


