
Serial Peripheral Interface (SPI) is an interface bus commonly used to send data between micro controllers and small peripherals. It is a synchronous, full duplex master-slave-based interface with a single master.
It has four logic signals,
- SCLK: Serial Clock (output from master)
- MOSI: Master Out Slave In (data output from master)
- MISO: Master In Slave Out (data output from slave)
- SS: Slave Select (often active low, output from master)
MOSI on a master connects to MOSI on a slave. MISO on a master connects to MISO on a slave. Slave Select as the name suggests is used to select one of the several slaves connected to the Master.
In this tutorial, we are going to discuss Serial Peripheral Interface (SPI) and how to read from or write to or erase the SPI flash.
Step 1: What You Will Need
- Arty7 35t/100t board with either
pinaka, parashu or vajraprogrammed - shakti-sdk and shakti-tools installed or Platform IO installed and ready
Note: shakti-sdk and shakti-tools are currently a private repository. Please login or sign up to Gitlab and request access here before using it.
Step 2: Code
Here we demonstrate how to read from or write to or erase the SPI flash in Arty7 board.
- Write: Please click here to have a look at the code of spi_write.
- Read: Please click here to have a look at the code of spi_read.
- Erase: Please click here to have a look at the code of spi_erase.
Code can be compiled and run using the following ways,
- Using terminal on a system with shakti-sdk and shakti-tools installed (Manual method).
- Using Platform IO IDE.
Step 3.1: Manual Method
3.1.1 Compile and build
- Move to
shakti-sdk
cd shakti-sdk
- Compile using
make software PROGRAM=? TARGET=?. Typemake list_applnsto list all the applications available in the SDK. Target can be eitherparashu, pinaka or vajra. Here we useparashu.
SPI Erase:
make software PROGRAM=spierase TARGET=parashu
SPI Read:
make software PROGRAM=spiread TARGET=parashu
SPI Write:
make software PROGRAM=spiwrite TARGET=parashu
3.1.2 Execution:
Once the application is built, the executable is generated in the output folder. The executable is in ELF file format and they have the extension .shakti. Now, open three terminals, one for each of the following,
- One terminal for UART terminal display
(miniterm) - Another for
GDB server. - And the last one for
OpenOCD.
Terminal 1: Firstly, Connect to serial output by using miniterm or gtkterm with the baud rate of 19200.
For instance,
$ sudo miniterm.py /dev/ttyUSB1 19200
Note:
- “/dev/ttyUSB1” – ttyUSB means “USB serial port adapter”
- The “1” (“0” or “1” or “2”“here means the USB device number on your system. The FPGA board is connected to that USB device number.
Terminal 2: After that, Connect to the FPGA board by using the OpenOCD provided by shakti-tools and its respective configuration file. (Read how OpenOCD and RISC-V GDB work together to establish a connection between our PC and the Microprocessor)
For instance, if we use parashu,
$ cd shakti-sdk
$ cd ./bsp/third_party/parashu
$ sudo $(which openocd) -f ftdi.cfg
For pinaka and vajra, Goto cd ./bsp/third_party/<pinaka or vajra>
Terminal 3: Now, open either 32-bit or 64-bit RISC-V GDB based on your architecture i.e riscv32-unknown-elf-gdb or riscv64-unknown-elf-gdb respectively from shakti-tools.
The output executable is created in
- spi erase:
<path-to-shakti-sdk>/software/examples/spi_applns/spierase/outputasspierase.shakti. - spi read:
<path-to-shakti-sdk>/software/examples/spi_applns/spiread/outputasspiread.shakti. - spi write:
<path-to-shakti-sdk>/software/examples/spi_applns/spiwrite/outputasspiwrite.shakti.
Load up the required.shakti file by following the below steps. For parashu,
$ riscv32-unknown-elf-gdb
(gdb) set remotetimeout unlimited
(gdb) target remote localhost:3333
(gdb) file path/to/executable
(gdb) load
(gdb) c
4.1.3 Upload to flash
Steps to generate standalone user application:
The SHAKTI-SDK has a uploader tool that is used to load a content (such as ELF) to flash, after building the image.
- Goto the right directory.
cd shakti-sdk
- The make upload command is used to build and upload the application to the flash automatically.
SPI Erase:
make upload PROGRAM=spierase TARGET=parashu
SPI Read:
make upload PROGRAM=spiread TARGET=parashu
SPI Write:
make upload PROGRAM=spiwrite TARGET=parashu
PROGRAM is the new bare metal user application that is created. Type make list_applns to list all the applications available in the SDK.
Step 4.2: Using Platform IO
We can use IDE’s like Platform IO to compile, build, run, upload and debug. Please read the article on Platform IO on SHAKTI to understand the steps.
Miniterm Output:
Erase:
Read:
WRITE:
This routine contains erase, write then read functions of SPI. First we erase the Flash. Then write to it and read from it.
--- Miniterm on /dev/ttyUSB1: 19200,8,N,1 ---
--- Quit: Ctrl+] | Menu: Ctrl+T | Help: Ctrl+T followed by Ctrl+H --- ((
,(((((
*((((((
./(((((((
./((((((((
*(((((((((
.(((((((((((
,((((((((((((
((((((((((((((
.((((((((((((((
*(((((((((((
/(((((((
*((((((((
*(((((((
(((((((((
((((((((((
(((((((((((((
((((((((((((((
((((((((((((
*((((((((((
(((((((((
*(((((((
*((((((
.(((((
./(((
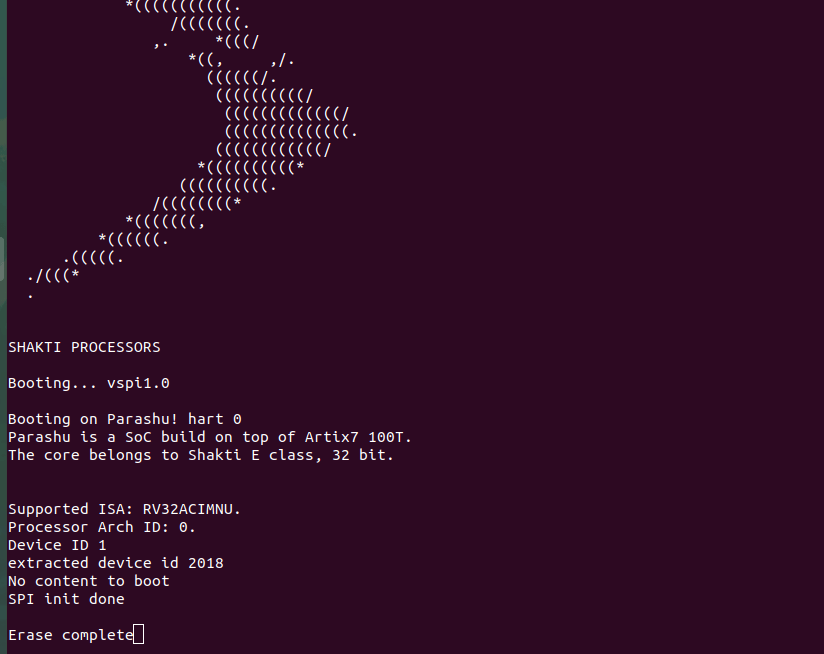
SHAKTI PROCESSORS
Booting… vspi1.0
Booting on Parashu! hart 0
Parashu is a SoC build on top of Artix7 100T.
The core belongs to Shakti E class, 32 bit.
Supported ISA: RV32ACIMNU.
Processor Arch ID: 0.
Device ID 1
extracted device id 2018
……SPI init done
Before Erase
Reading from adddress b00004 and data 297
Reading from adddress b00008 and data 9028293
Reading from adddress b0000c and data 30529073
Reading from adddress b00010 and data 41014081
Reading from adddress b00014 and data 42014181
Reading from adddress b00018 and data 43014281
Reading from adddress b0001c and data 44014381
Reading from adddress b00020 and data 5014481
Reading from adddress b00024 and data 46014581
Reading from adddress b00028 and data 47014681
Reading from adddress b0002c and data 48014781
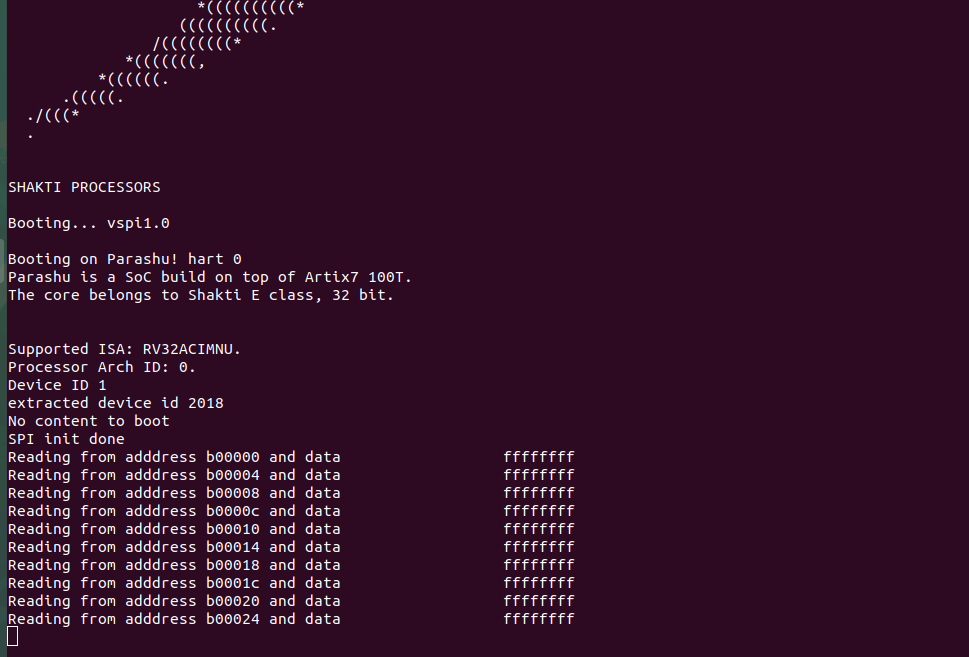
After Erase
Reading from adddress b00004 and data ffffffff
Reading from adddress b00008 and data ffffffff
Reading from adddress b0000c and data ffffffff
Reading from adddress b00010 and data ffffffff
Reading from adddress b00014 and data ffffffff
Reading from adddress b00018 and data ffffffff
Reading from adddress b0001c and data ffffffff
Reading from adddress b00020 and data ffffffff
Reading from adddress b00024 and data ffffffff
Reading from adddress b00028 and data ffffffff
Reading from adddress b0002c and data ffffffff
Flash write done on address b00004 and data deadbeef
After Write
Reading from adddress b00004 and data 12345678
Reading from adddress b00008 and data aaaaaaaa
Reading from adddress b0000c and data 55555555
Reading from adddress b00010 and data aaaa5555
Reading from adddress b00014 and data 5555aaaa
Reading from adddress b00018 and data aaa5aaa5
Reading from adddress b0001c and data 555a555a
Reading from adddress b00020 and data aa55aa55
Reading from adddress b00024 and data 55aa55aa
Reading from adddress b00028 and data 5a5a5a5a
Reading from adddress b0002c and data a5a5a5a5
Akshaya currently works at the RISE labs. Her favorite subjects are Web designing and Microprocessors. She loves learning about new things and writing about them!