The OLED (organic light-emitting diode) stands out as a compelling alternative to the traditional LCD. While LCDs are passive in nature, OLEDs are active, boasting built-in amplifiers. With their compact size, vibrant brightness, and remarkable lightweight design, OLEDs have found extensive application in a range of handheld and pocket-sized portable gadgets.
An OLED display differs from a character LCD display in that it doesn’t rely on a backlight, as it generates its own light. This special quality is what makes the OLED display stand out with its impressive features, like strong contrast, a wide view from different angles, and the ability to show really dark blacks. OLED displays are available in a range of sizes (such as 128×64, 128×32) and colors (such as white, blue, and dual-color OLEDs). Some OLED displays have an I2C interface, while others have an SPI interface. One thing they all have in common, is that at their core is a powerful single-chip CMOS OLED driver controller – SSD1306, which handles all RAM buffering.
In this blog post, we delve into how to interface OLED displays with Shakti.
Main features
| Display Technology | OLED (Organic LED) |
| MCU Interface | I2C / SPI |
| Screen Size | 0.96 Inch Across |
| Resolution | 128×64 pixels |
| Operating Voltage | 3.3V – 5V |
| Operating Current | 20mA max |
| Viewing Angle | 160° |
| Characters Per Row | 21 |
| Number of Character Rows | 7 |
Protocol
Here, I2C protocol is used.
Step 1: What You Will Need
- Arty7 35t/100t board with either
pinaka, parashu or vajraprogrammed - 0.96 Inch I2C OLED Display.
- Micro USB Cable.
- Jumper Wires.
- shakti-sdk and shakti-tools installed and ready.
Step 2: The Circuit
Connection of 0.96 Inch I2C OLED Display,
- VCC connect to +3.3V
- GND to GND
- SCL to SCL
- SDA to SDA
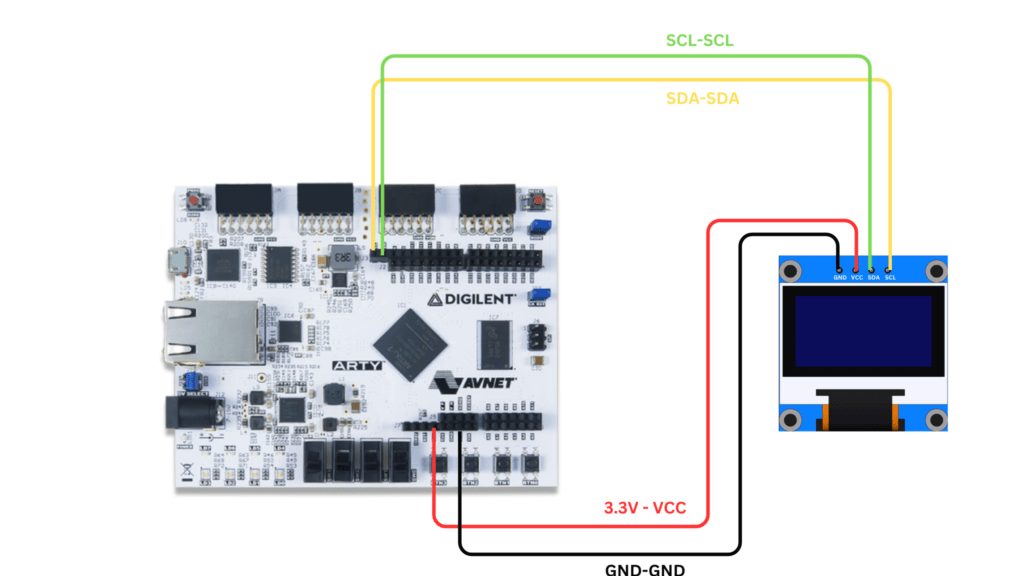
Here we use Arty100t for instance. Also, the connections are the same in Arty35t boards. For better clarity, Check the device pin mapping for pinaka, parashu and vajra for better understanding.
Step 3: Code
Please click here to have a look at the code of 0.96″ OLED
Code can be compiled and run using the following ways,
- Using terminal on a system with shakti-sdk and shakti-tools installed (Manual method).
Step 4.1: Manual Method
- Move to
shakti-sdk
cd shakti-sdk
- Compile using
make software PROGRAM=oled TARGET=vajra. Typemake list_applnsto list all the applications available in the SDK. Target can be eitherparashu, pinaka or vajra.
- For instance, Use target as
vajra
make software PROGRAM=oled TARGET=vajra
4.1.2 Execution:
Once the application is built, the executable is generated in the output folder. The executable is in ELF file format and they have the extension .shakti. Now, open three terminals, one for each of the following,
- One terminal for UART terminal display
(miniterm) - Another for
GDB server - And the last one for
OpenOCD.
Terminal 1: Firstly Connect to serial output by using miniterm or gtkterm with the baud rate of 19200.
For instance,
$ sudo miniterm.py /dev/ttyUSB1 19200
Note:
- “/dev/ttyUSB1” – ttyUSB means “USB serial port adapter”
- The “1” (“0” or “1” or “2”“here means the USB device number on your system. The FPGA board is connected to that USB device number.
Terminal 2: After that, Connect to the FPGA board by using the OpenOCD provided by shakti-tools and its respective configuration file. (Read how OpenOCD and RISC-V GDB work together to establish a connection between our PC and the Microprocessor)
For instance, if we use parashu,
$ cd shakti-sdk
$ cd ./bsp/third_party/parashu
$ sudo $(which openocd) -f ftdi.cfg
For pinaka and vajra, Go to cd ./bsp/third_party/<pinaka or vajra>
Terminal 3: Now, open either 32-bit or 64-bit RISC-V GDB based on your architecture i.e riscv64-unknown-elf-gdb or riscv32-unknown-elf-gdb respectively from shakti-tools.
The output executable is created in <path-to-shakti-sdk>/software/examples/i2c_applns/oled/output as oled.shakti. Load up the .shakti file by following the below steps,
$ riscv64-unknown-elf-gdb
(gdb) set remotetimeout unlimited
(gdb) target remote localhost:3333
(gdb) file path/to/executable
(gdb) load
(gdb) c
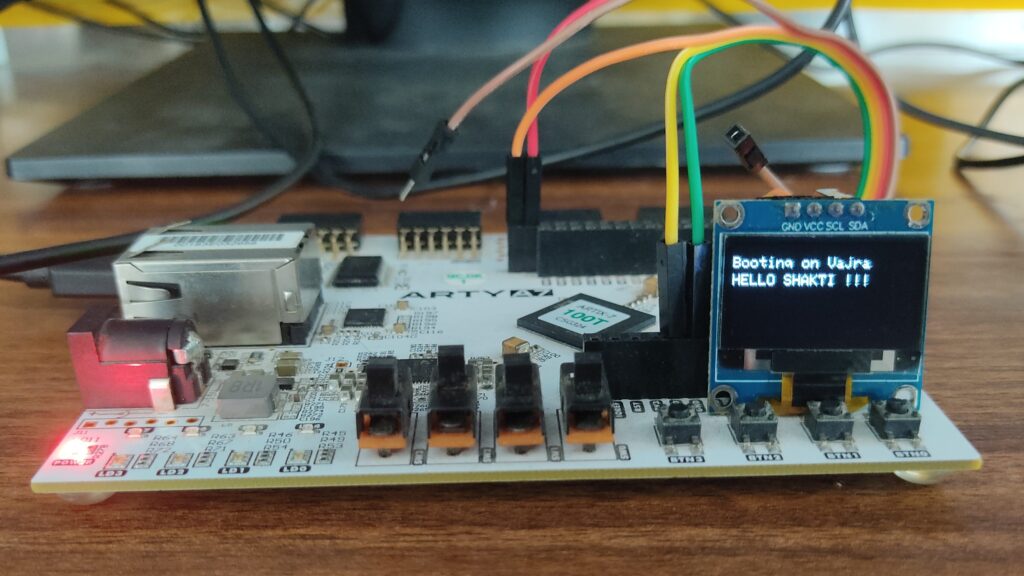
Output

Balaji is currently working in RISE Lab. He has a deep passion for tinkering with sensors and development boards..