
Shakti “E Class” has 2 Universal Asynchronous Receiver Transmitter (UART) ports and “C Class” has 3 Universal Asynchronous Receiver Transmitter (UART) ports. In this tutorial, we are going to discuss how Universal Asynchronous Receiver/Transmitter (UART) protocol works and its various registers and functions.
HOW UART WORKS:
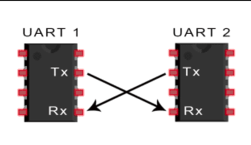
The UART that is going to transmit data receives the data from a data bus. Then, the data bus is used to send data to the UART by another device like a CPU, memory, or micro-controller. Data is transferred from the data bus to the transmitting UART in parallel form. After the transmitting UART gets the parallel data from the data bus, it adds a start bit, a parity bit, and a stop bit, creating the data packet. Then, the data packet is sent out serially, bit by bit at the Tx pin.
The receiving UART reads the data packet bit by bit at its Rx pin. The receiving UART then converts the data back into parallel form and removes the start bit, parity bit, and stop bits. Finally, the receiving UART transfers the data packet in parallel to the data bus on the receiving end.
Understanding UART registers
Let’s see the registers available in UART. From platform.h we can see that the UART 0 address starts at 11300. As we can see the OFFSET is 100, UART1 starts at address 11400. In uart.h, we can see the struct to access UART registers as 32 bit registers.
| Register | struct name | Size | Address UART0 | Address UART1 |
|---|---|---|---|---|
| Baud rate register | unsigned short baud | 16bits | 11300 | 11400 |
| Reserve | unsigned short reserv0 | 16bits | 11302 | 11402 |
| Transmission register | unsigned int tx_reg | 32bits | 11304 | 11404 |
| Receive register | unsigned int rcv_reg | 32bits | 11308 | 11408 |
| Status register | unsigned char status | 8bits | 1130c | 1140c |
| Reserve | unsigned char reserv1 | 8bits | 1130d | 1140d |
| Reserve | unsigned short reserv2 | 16bits | 1130e | 1140e |
| Delay | unsigned short delay | 16bits | 11310 | 11410 |
| Reserve | unsigned short reserv3 | 16bits | 11312 | 11412 |
| Control | unsigned short control | 16bits | 11314 | 11414 |
| Reserve | unsigned short reserv5 | 16bits | 11316 | 11416 |
| Interrupt enable | unsigned char ien | 8bits | 11318 | 11418 |
| Reserve | unsigned char reserv6 | 8bits | 11319 | 11419 |
| Reserve | unsigned short reserv7 | 16bits | 1131a | 1141a |
| Input qualification cycles | unsigned char iqcycles | 8bits | 1131c | 1141c |
| Reserve | unsigned char reserv8 | 8bits | 1131d | 1141d |
| Reserve | unsigned short reserv9 | 16bits | 1131e | 1141e |
| RX FIFO size configuration register | unsigned char rx_threshold | 8bits | 11320 | 11420 |
| Reserve | unsigned char reserv10 | 8bits | 11321 | 11421 |
| Reserve | unsigned short reserv11 | 16bits | 11322 | 11422 |
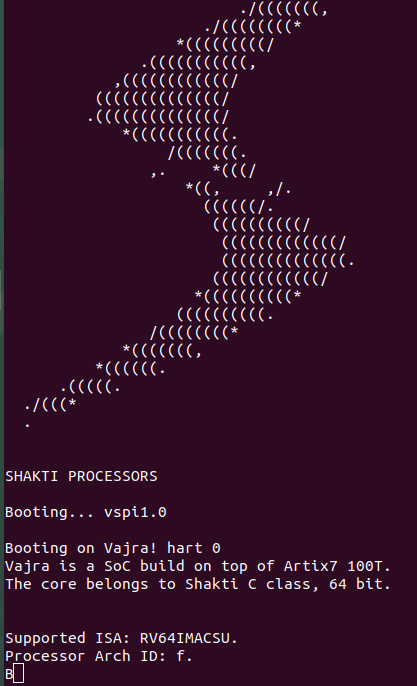
Now, lets open three terminals for SHAKTI
- Miniterm connected to UART0
- OpenOCD
- RISC-V GDB
Now we are going to try transmitting and reading from the UART directly using UART registers. Also, using the functions. Lets see just how to do that!
Step1: Setting the Baud rate for the UART instance’s register
The baud rate is a measure of the number of bits per second that can be transmitted or received by the UART. Clock frequency for SHAKTI is 50 MHz.
Baud count = Internal clock frequency/( 16* Baud rate)
You can do this by calling the set_baud_rate function or by writing the hex value directly onto the address of the baud rate register.
| Baud rate | Calculation | Decimal value | Hex value |
|---|---|---|---|
| 9600 | 50,000,000/ (16*19200) | 325.5 (326) | 146 |
| 19200 | 50,000,000/ (16*19200) | 162.7 (163) | a3 |
| 38400 | 50,000,000/ (16*38400) | 81.3 | 51 |
| 57600 | 50,000,000/ (16*57600) | 54.2 | 36 |
| 115200 | 50,000,000/ (16*115200) | 27.1 | 1b |
For instance, if you want to set the baud rate for UART 0 as 19200,
- write 0xa3 to address 11300
- Use function,
set_baud_rate(uart_instance[0], 19200);
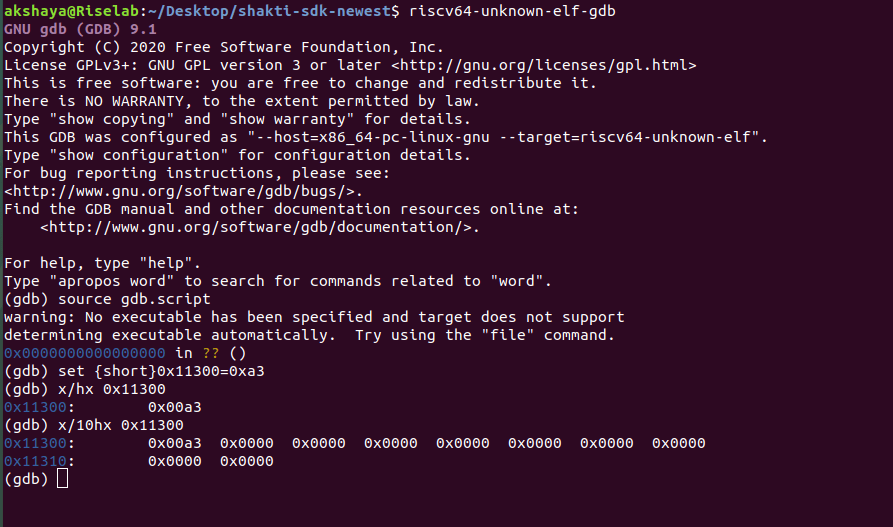
Setting baud rate as 19200 through RISC-V GDB, use the following command
set {short}0x11300=0x00a3
Step 2: Write data to the UART Instance
This is similar to the putchar function. Now we are going to print a character to the Miniterm which is connected to UART 0. This can be done in two ways,
- use
write_uart_character(uart_instance[0],'B'); - Write ascii value of char ‘B’ onto the tx_reg i.e address 11304
Writing character ‘B’ to the miniterm through GDB
set {unsigned char}0x11304=66 #66 is the ASCII value of B
Step 3: Read data from the UART instance
This is similar to getchar function. Now we are going to read a char from miniterm that is connected to UART0. This can be done in two ways,
- Use
read_uart_character(uart_instance[0], &t);//t is a variable - Read the address of
rx_regi.e 11308
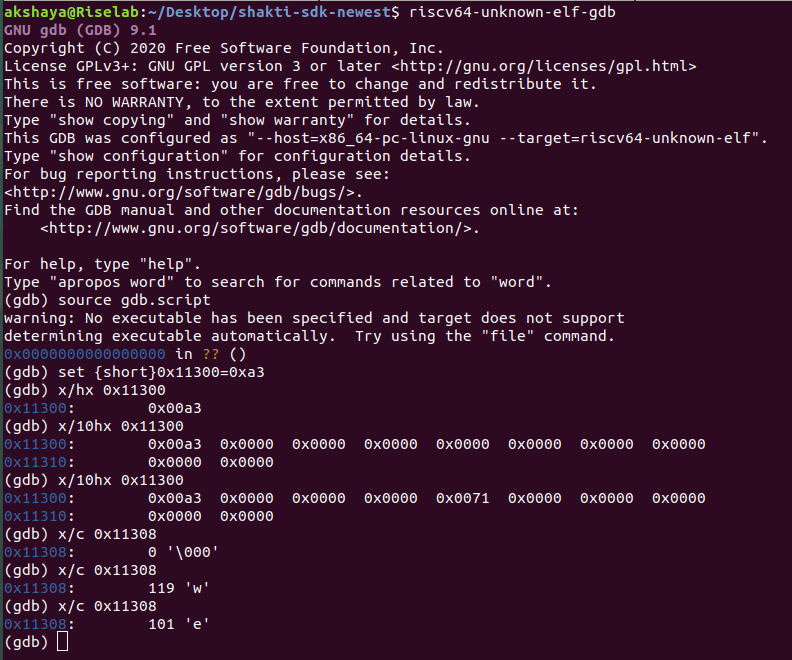
For instance, Reading the char pressed from the RISC-V GDB, use the following command
x/c 0x11308 #displays char at the memory location.
Pressing q, w, e from the miniterm and checking the address location 11308 simultaneously
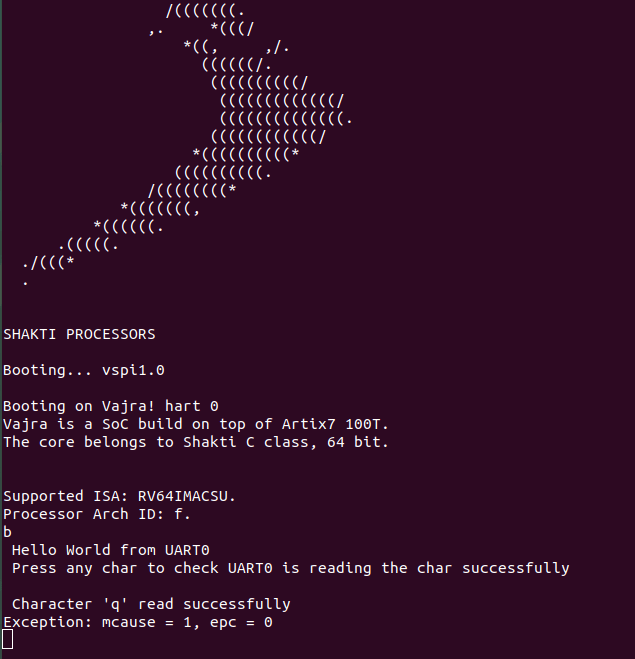
Simple UART program to read and write to UART 0
include "uart.h"

void main()
 {
    int t;
    set_baud_rate(uart_instance[0], 19200);
    write_uart_character(uart_instance[0],'b');
    write_uart_string (uart_instance[0], "\n Hello World from UART0");
    printf("\n Press any char to check UART0 is reading the char successfully\n");
   read_uart_character(uart_instance[0], &t); // Read the data
   if(t != 0 )
   {
       printf("\n Character '%c' read successfully ", t);
    }
 }
Check out this article on “How to print “Hello World” on Shakti using Arduino IDE?“
Akshaya currently works at the RISE labs. Her favorite subjects are Web designing and Microprocessors. She loves learning about new things and writing about them!


Please make a blog on XADC, I cannot get correct values while reading from an external sensor.