
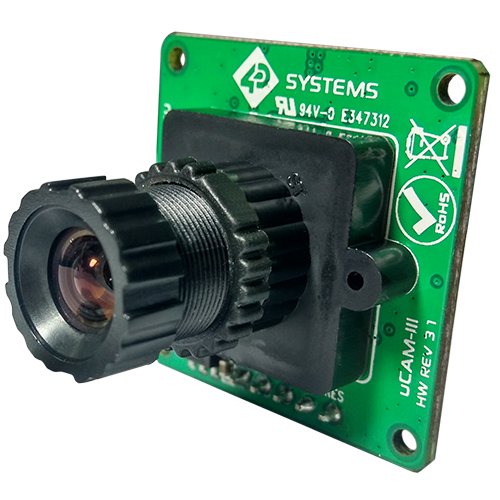
In this tutorial, we will use the UCAM-III camera with the Shakti Processor. It uses a simple serial protocol that can instruct it to send either low resolution (80×60 to 160×120) single frame raw images for viewing or high resolution (160×128 to 640×480) JPEG images for storage or viewing. It also comes with additional wide-angle lenses.
Protocol
The UCAM-III uses UART protocol to communicate with the camera. The camera requires 5V input.
Video Tutorial:
Step 1: What You Will Need?
- UCAM-III camera
- A UART to USB converter FT232 Chip
- Arty7 35t/100t board with either
pinaka, parashu or vajraprogrammed - Micro USB Cable.
- Jumper Wires.
- shakti-sdk and shakti-tools installed
Note: shakti-sdk and shakti-tools are currently a private repository. Please login or sign up to Gitlab and request access here before using it.
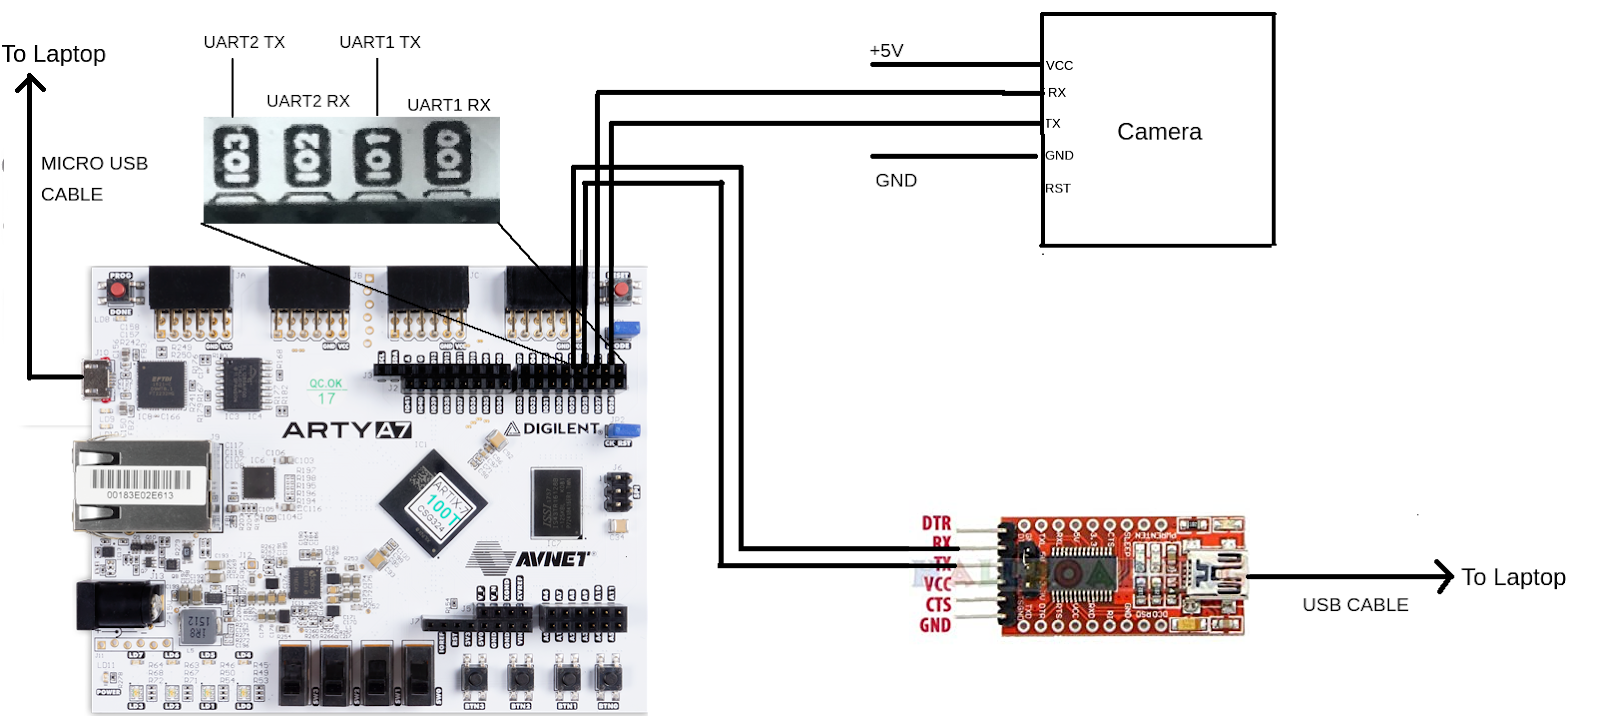
Step 2: The Circuit
Connections are as follows,
- FT232 RX to IO3 [UART2 TX]
- FT232 TX to IO2 [UART2 RX]
- U CAM III RX to IO1 [UART1 TX]
- U CAM III TX to IO0 [UART1 RX]
Step 3: Code
Please have a look at the code. After connecting the UCAM to Laptop and the UART interface, We run the code. The camera takes pictures periodically and sends it to the Laptop via the UART Interface byte by byte. The image received is then processed and saved inside the Images folder.
Step 4.1: Manual Method
4.1.1 Compile and build
receive_image.c is the code used to receive the image from the SHAKTI Processor to the Laptop using UART Interface. Therefore compile this first.
- Move to right directory
cd shakti-sdk/software/projects/uart-cam/ucam_test
- Before compiling, create a new folder called “Images”
$ mkdir Images
- Then compile the program using
makeutility.
$ makegcc -std=gnu99 recieve_image.c
Now we compile the program that is to be loaded on the Shakti Processor.
- Move to
shakti-sdk
cd shakti-sdk
- Compile using
make software PROGRAM=? TARGET=?. TheTARGETcan be eitherparashu, pinaka or vajra.
For instance, here we se target as parashu,
make software PROGRAM=uart-cam TARGET=parashu
4.1.2 Execution:
Once the application is built, the executable is generated in the output folder. The executable is in ELF file format and they have the extension .shakti. Now, open four terminals, one for each of the following,
- One terminal for UART terminal display
(miniterm) - Another for
GDB server - One for
OpenOCD. - Last one for receiving the image via UART
Terminal 1: Firstly Connect to serial output by using miniterm or gtkterm with the baud rate of 19200.
For instance,
$ sudo miniterm.py /dev/ttyUSB1 19200
Note:
- “/dev/ttyUSB1” – ttyUSB means “USB serial port adapter”
- The “1” (“0” or “1” or “2”“here means the USB device number on your system. The FPGA board is connected to that USB device number.
Terminal 2: After that, Connect to the FPGA board by using the OpenOCD provided by shakti-tools and its respective configuration file. (Read how OpenOCD and RISC-V GDB work together to establish a connection between our PC and the Microprocessor)
For instance, if we use parashu,
$ cd shakti-sdk
$ cd ./bsp/third_party/parashu
$ sudo $(which openocd) -f ftdi.cfg
For pinaka and vajra, Goto cd ./bsp/third_party/<pinaka or vajra>
Terminal 3: Now, open either 32-bit or 64-bit RISC-V GDB based on your architecture i.e riscv32-unknown-elf-gdb or riscv64-unknown-elf-gdb respectively from shakti-tools.
The output executable is created in <path-to-shakti-sdk>/software/projects/uart-cam/ucam/output as uart-cam.shakti.
Load up the .shakti file by following the below steps. For Parashu,
$ riscv32-unknown-elf-gdb
(gdb) set remotetimeout unlimited
(gdb) target remote localhost:3333
(gdb) file path/to/executable
(gdb) load
(gdb) c
Terminal 4: In this terminal, we run the code to receive the images captured from the SHAKTI Processor via interface. Now, the images are in turn saved inside the folder Images created in the step before.
- Move to right directory
$ cd shakti-sdk/software/projects/uart-cam/ucam_test
Now, run the a.out file. The port should be given as command line input, make sure it is the correct port.
$ sudo ./a.out /dev/ttyUSB1
Note: To get list of USB ports connected, use ls /dev/ttyUSB*
Miniterm Output
--- Miniterm on /dev/ttyUSB1: 19200,8,N,1 ---
--- Quit: Ctrl+]  |  Menu: Ctrl+T | Help: Ctrl+T followed by Ctrl+H ---
                                        ((
                                    ,(((((
                                *((((((
                           ./(((((((
                       ./((((((((
                    *(((((((((
                .(((((((((((
             ,((((((((((((
           ((((((((((((((
          .((((((((((((((
              *(((((((((((
                   /(((((((
                  *((((((((
                     *(((((((
                       (((((((((
                        ((((((((((
                         (((((((((((((
                         ((((((((((((((
                        ((((((((((((
                      *((((((((((
                    (((((((((
              *(((((((
           *((((((
       .(((((
   ./(((
SHAKTI PROCESSORS
Booting... vspi1.0

Booting on Parashu! hart 0
Parashu is a SoC build on top of Artix7 100T.
The core belongs to Shakti E class, 32 bit.
Supported ISA: RV32ACIMNU.
Processor Arch ID: 0.
Device ID 1
extracted device id 2018
Round : 1
Round : 2
Round : 3
Round : 4
Round : 5
Round : 6
Round : 7

synchronisation process done waiting for 2 seconds for stabilisation

you are all set
New size : 20432
Imgdone
New size : 20402
Imgdone
New size : 20504
Imgdone
New size : 20588
Imgdone
New size : 20306
Imgdone
Output in the Fourth terminal
Baud rate is set to 115200
BaudRate = 115200
StopBits = 1
Parity   = none
Size : 20432
Image 1 done
Size : 20402
Image 2 done
Size : 20504
Image 3 done
Size : 20588
Image 4 done
Size : 20306
Image 5 done
Akshaya currently works at the RISE labs. Her favorite subjects are Web designing and Microprocessors. She loves learning about new things and writing about them!
Hello,
I’m trying to do this, every command is working properly but then the uCAM IIII isn’t syncing with the shakti fpga board.
Please guide me, stuck here since a week.
Thanks!